express
설치
디렉토리 생성 및 이동
mkdir myapp
cd myapp
프로젝트를 npm이 관리하는 패키지로 선언 (=> package.json 생성)
npm init
npm이 express를 다운
npm install --save express사용법
main(entry):최초의 진입점 application 만들기 (app.js)
var express = require("express");
var app = express();
app.use(express.static(""));

app.get("/route", function (req, res) {
  res.send('hello, <img src="/route.png">');
});
app.get("/", function (req, res) {
  res.send("hello home page");
});
app.get("/login", function (req, res) {
  res.send("<h1>hello login page</h1>");
});

app.listen(3000, function () {
  console.log("Connected 3000 port!");
});
var express = require("express");
var app = express();
express를 사용하려면 함수처럼 사용해야 한다.
app.use(express.static("public"));
정적인 파일이 위치할 디렉토리를 지정
app.get("/route", function (req, res) {
res.send('hello, <img src="/route.png">');
});
public 폴더의 정적 파일(img, html)을 불러와 보여준다.
app.get('url주소',function(){ });
사용자가 어떤 경로로 들어올때 볼 화면을 만들어줌.
.get을 router라고 하며 router가 하는 일을 routing이라고 한다.
(일반적으로 get으로 홈에 들어오기 때문에 get()사용)
app.listen(3000, function () {
console.log("Connected 3000 port!");
});
3000번 port와 연결시켜준다.
동적파일, 정적파일
동적파일 (수정하면 서버 끊고 다시 연결해야 함)
localhost:3000/dynamic

var express = require("express");
var app = express();
app.use(express.static(""));

app.get("/dynamic", function (req, res) {
  const output = `<!DOCTYPE html>
    <html lang="en">
      <head>
        <meta charset="UTF-8" />
        <title></title>
      </head>
      <body>
        Hello, Static!
      </body>
    </html>
    `;
  res.send(output);
});
정적파일 (수정해도 바로 볼 수 o)
localhost:3000/static.html
템플릿 엔진
js코드와 변수를 사용할 수 있는 html
설치 및 환경설정
jade 설치
npm install jade --save
express에 jade를 알려주기 (= 템플릿파일의 확장자 정해주기)
//app.js

app.set('view engine','jade');
템플릿이 있는 폴더를 express에 알려주기 (+ 최상위 아래 views폴더(./views위치에) 생성)
//app.js

app.set('views','./views');          //./views와 동일하게 폴더 생성
사용법
1. 기본 템플릿 파일을 렌더링하기
//app.js

app.get('/template', function(req,res){
   res.render(temp);
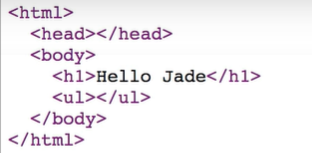
});template 주소로 들어가면 views폴더 아래 temp라는 템플릿 파일(temp.jade)을 웹페이지로 렌더링해 전송한다.
//temp.jade

html
    head
    body
        h1 Hello Jade
        ul
결과

2. js로 프로그래밍적 제어하기
//temp.jade

html
    head
    body
        h1 Hello Jade
        ul
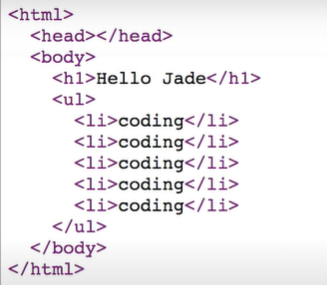
            -for(var i =0;i<5;i++)  //js로 프로그래밍적 제어하기 위한 코드는 -붙이기
                li coding
결과

3. app에서 html에 데이터 주입하기
//app.js

app.get('template',function(req,res){
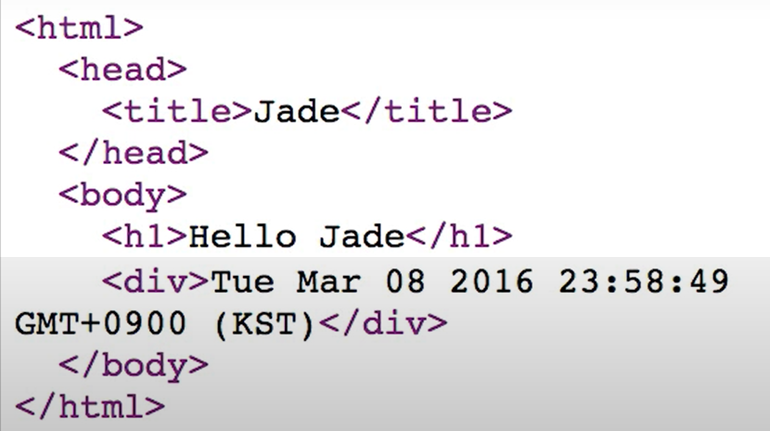
	res.render('temp', {time : Date(), _title : "Jade" });   //객체로 변수 값 넘기기
});
//temp.jade
html
head
title= _title //_title은 변수
body
h1 Hello Jade
div= time //변수는 =를 사용하기결과

팁
express에서 예쁜 html 출력하는 방법
//app.js

app.local.pretty=true;
'Nodejs' 카테고리의 다른 글
| [Node.js] supervisor 서버 자동on/off (0) | 2021.09.23 |
|---|---|
| [Node.js] 서버에 데이터 저장 (파일로 저장) (0) | 2021.09.23 |
| [Node.js] url 해부하기(query, params), Form으로 데이터 전달 (0) | 2021.09.23 |
| [Node.js] 동기, 비동기 (0) | 2021.09.15 |
| [Node.js] 인터넷, 모듈, NPM 프로젝트 시작, Callback (0) | 2021.09.06 |
